
Supplies to Make a Glue Collagraph Print
A glue collagraph is a printmaking plate made from a stiff background with a printable design created with glue. Here are the details…
Traditional collagraph plates are often built with layered papers, fabric, thread or organic embellishments. Sometimes a collagraph plate is also carved or incised to create recessed areas.
All of these treatments on a collagraph plate are in the interest of getting lovely patterns and shapes after the adhered items are inked (and sometimes wiped, to print intaglio style) and then printed against paper.
Mat Board and Glue Collagraph Plates
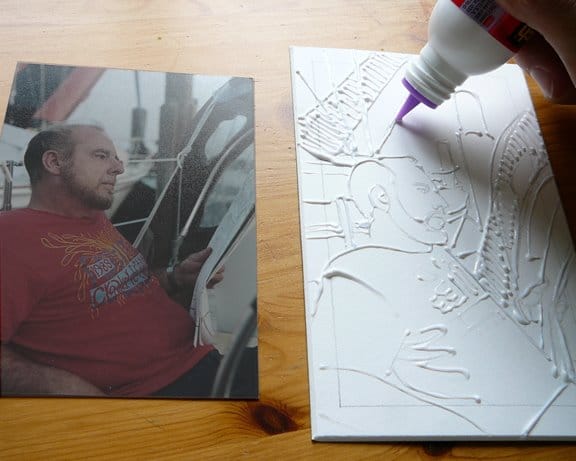
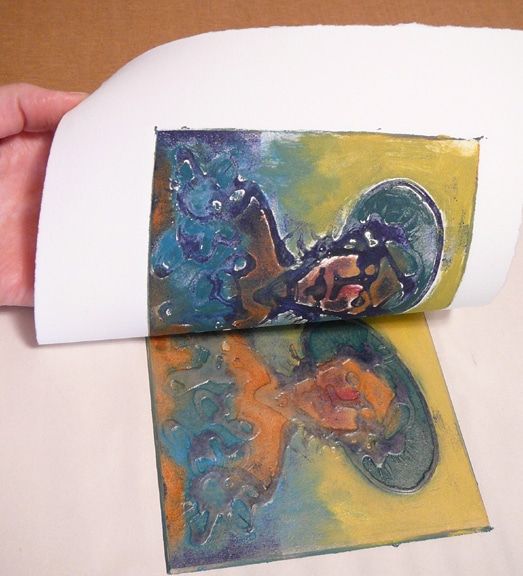
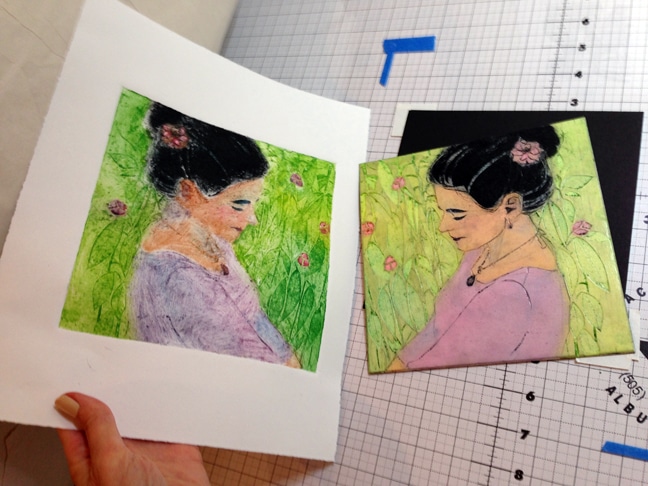
The collagraph in the image at the top of this post was made with a mat board (sometimes called mount board) plate, and drizzled glue (<– this is my favorite brand for these projects) left to harden. Once the glue dries, it becomes a printable, raised line on the plate.
This is a simple, straight-forward – and quite painterly approach – to collagraph printing. There is no carving or cutting involved, so it’s a suitable printmaking method for children too. Read on to learn more….
How Do you Make a Glue Collagraph?
Building a glue collagraph plate is quite simple. You’ll need a scrap piece of matboard, sealed front and back with Liquitex Gloss Varnish.
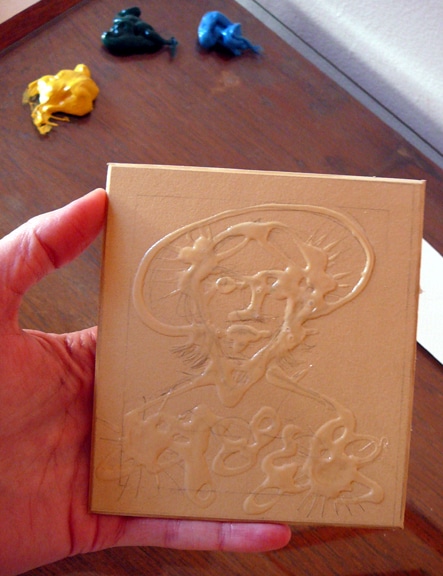
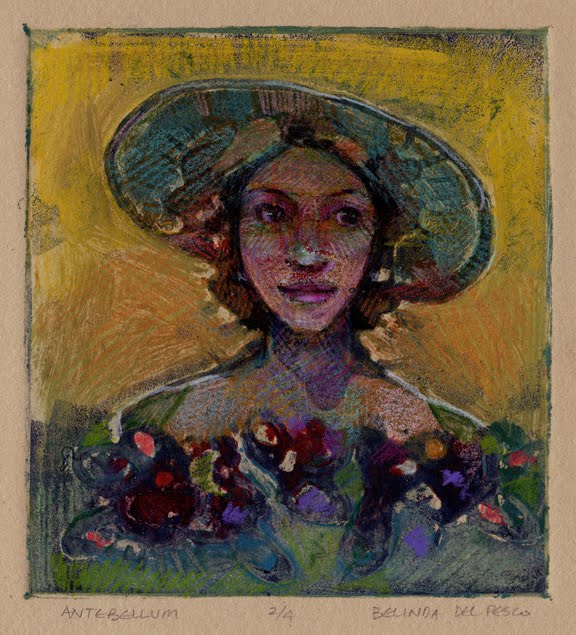
The suggested figure in the hat (above) was first sketched lightly in pencil directly on the mat board. Then the plate was sealed. Next, the figure was doodled using a bottle of glue that dries fast, and features a precision tip squeeze bottle – it’s called Scotch 3M glue.
The piles of intaglio printmaking ink (oil based) in the background of the photo above were used for a whole day of printing other plates, so you wouldn’t need this much for a project and plate this small. You can use water wash-up intaglio printmaking inks – like Akua and Caligo Safe-Wash too.
Note: be sure the intaglio inks you use to print your collagraphs are the type that don’t dry as soon as they’re exposed to air, as many water based inks do. Those inks will dry on your plate before you’ve even printed. And many of them re-wet and run when exposed to other wet media. You won’t be able to paint your print with watercolors if you use a re-wetting ink.
Inking the Glue Collagraph Plate
Here is the plate above, inked. I used an inexpensive paint brush to apply light shades of yellow, orange and cerulean blue inks to the background. I saved the darkest value of indigo blue ink to “top roll” the raised glue areas with a printmaking brayer.
This darker color on the raised glue adds contrast, and brings the linear elements of the glue-design up from the background colors on the pulled print.
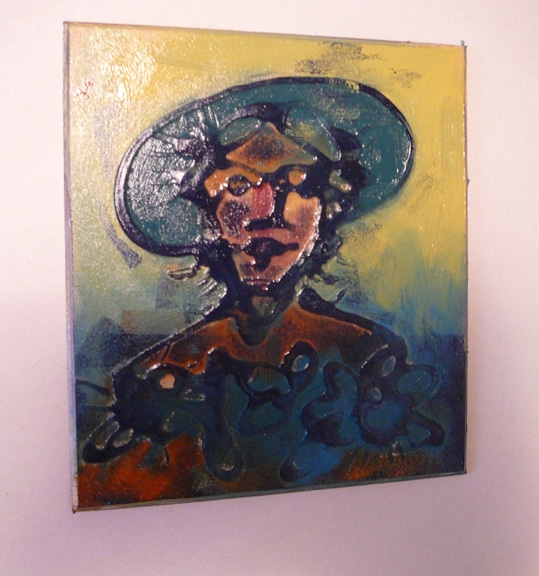
You can see that my brayer touched the background in some areas (hazy blue ink on the yellow background around her hat). But that’s completely fine, because this is a loosey-juicy printmaking method with lots of wiggle room for adding other media later.
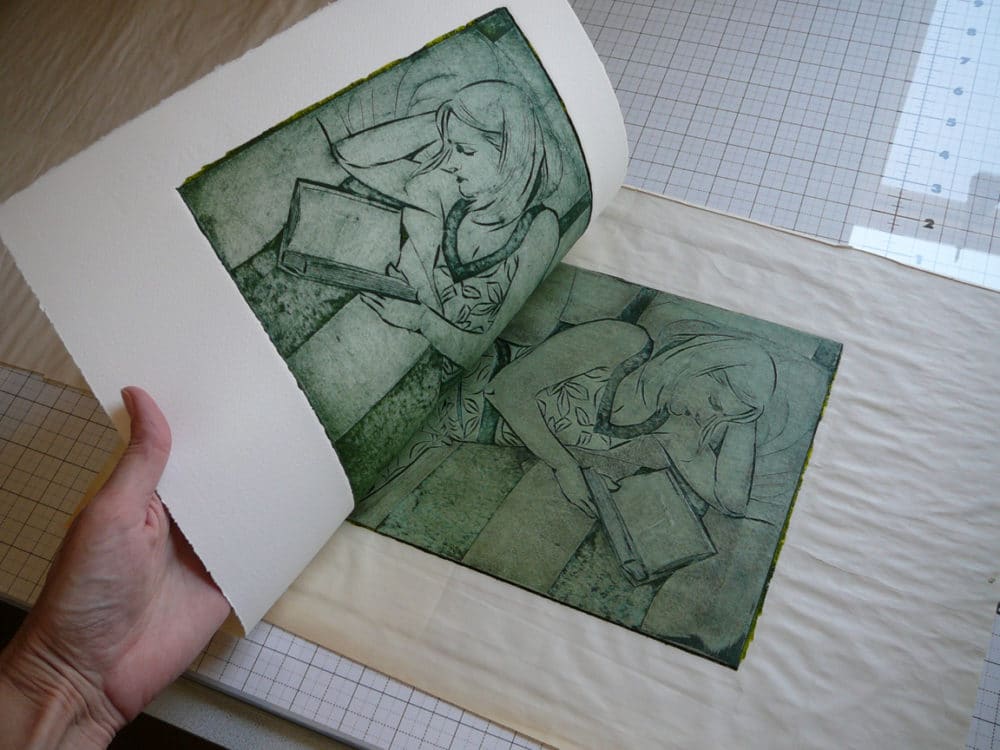
Transferring the Ink from the Plate to the Paper
After a trip through a small craft press, *or* a good hand-rub on the back of the paper with a spoon or a wooden drawer knob, the print is pulled from the plate to reveal a painterly image.
If you’re hand-transferring the image (without a press), I’d recommend two things;
1) keep your glue drawing pretty simple, with very few or no little circle or loop shapes. You won’t be able to get your paper into any “donut hole” raised glue interiors to collect background ink colors.
And 2) use a lightweight paper, soaked and blotted, like BFK Rives lightweight white paper, which will adhere well to the ink. It’s thin and flexible enough to curve around the raised glue areas to dip towards the flat surface of the plate and pick up your background colors.
BFK Rives is also tough enough to give you the option of adding other media to your print.
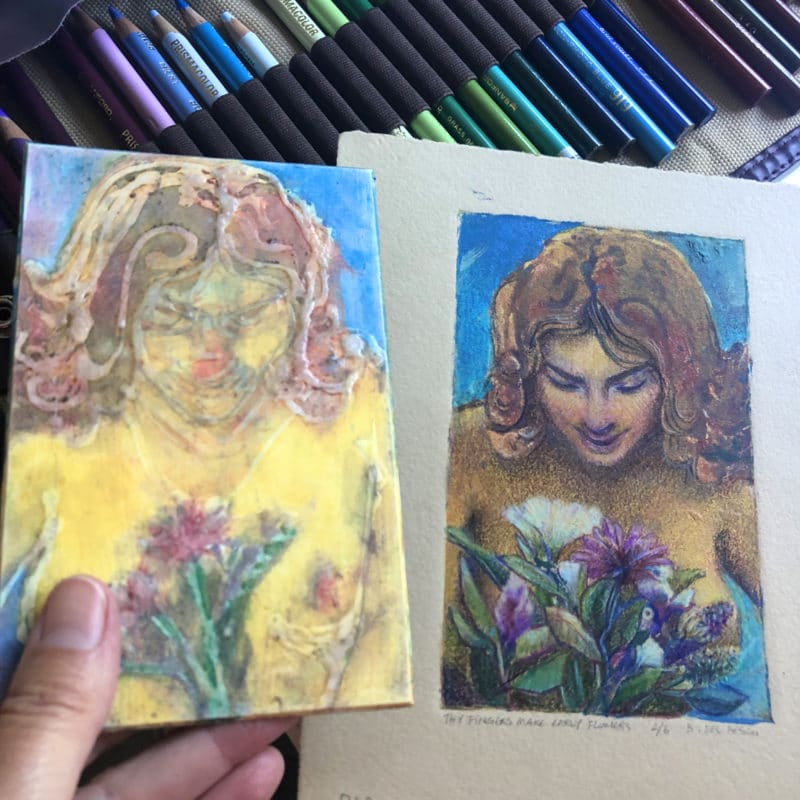
Enhancing Your Collagraph with Colored Pencil
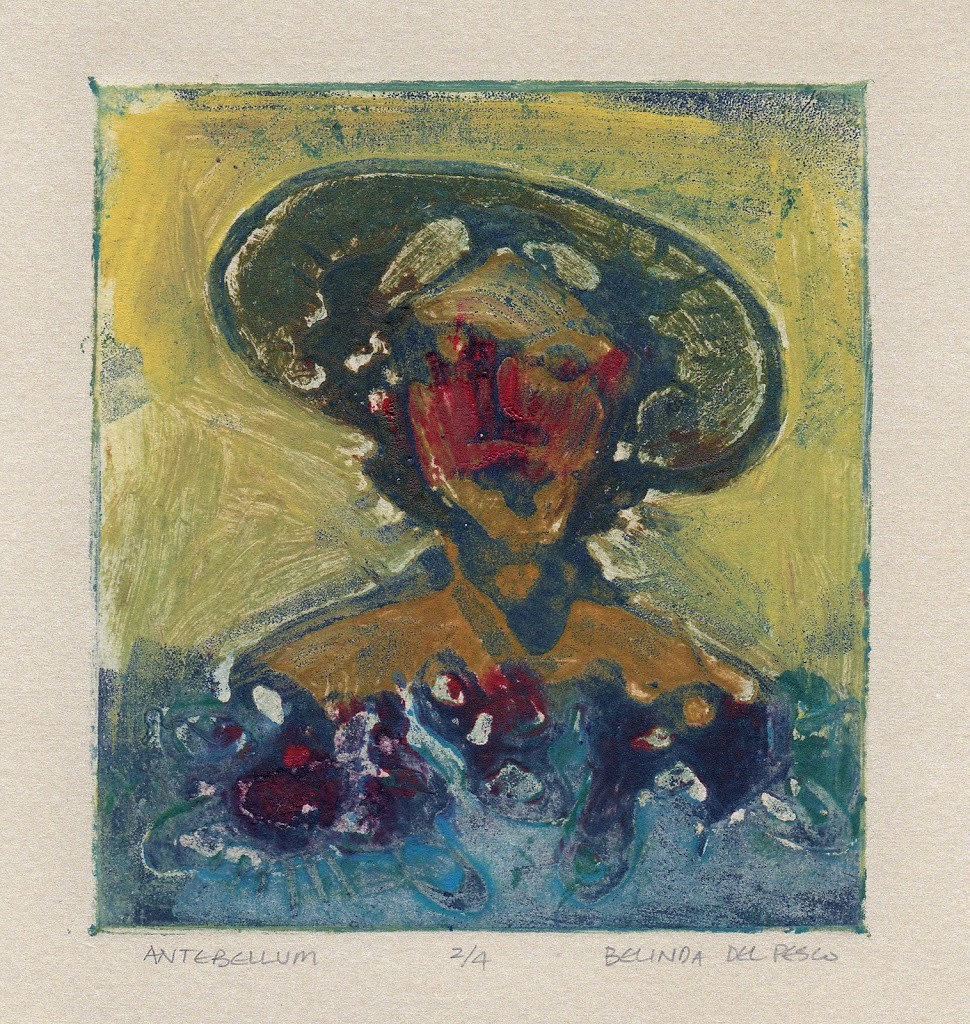
This (above) is what the print looked like before I added colored pencil. There is a variety of media you can add to the print after it’s dry – which is why you don’t have to be too fussy with the inking. Colored pencil, pastel, acrylic and oil all work very well on top of collagraph art prints.

Collagraph Print Editions
While the ink on your first glue collagraph dries, you can add more ink to the plate and print another collagraph in the same color scheme, or wipe the plate clean and add completely different colors to print it again.
The world is your oyster, so experiment and play with variations in colors, values (control values in a print strategically while wiping ink from the plate) and additional media.
Unfortunately, the plate for this print was stolen at an art exhibit. I packed the plate and supplies to describe/encourage the process to the art festival attendees. While talking with a patron for just a minute, I returned to the demo counter, to find the plate was gone.
Collagraph Video Tutorials
If you like this method of printmaking, and you’re interested in learning more, you can visit this playlist of collagraph printmaking tutorial videos.
Thanks for stopping by to check out this glue collagraph printmaking method. I hope you have a ton of fun experimenting in small format, with loads of colors, with the whole family.
I’ll see you in the next post!
Belinda
P.S. If you want to subscribe to this blog to get each post via email (it’s free), you can do that here.
Art Quote
One authentic portrait of Leonardo by his own hand exists in a red chalk drawing at the library at Turin. Dating from the last years of his life, it shows the face of a seer, moulded by incessant thought into firm, strongly marked lines.
The eyes lurk deep beneath shaggy brows, the hair and beard are long and straggling – it is the face of a man who has peered into hidden things and who has pondered deeply over what he discerned.
The beard is no longer “curled and well kept,” in the words of a contemporary document, wherein he is described as “of a fine person, well proportioned, full of grace and of a beautiful aspect, wearing a rose-coloured tunic, short to the knee, although long garments were then in use.”
Mr. Berenson has suggested that the youth in armour, who alone among all the figures in Leonardo’s Adoration of the Magi in the Louvre turns away from the scene and looks towards the spectator, is a portrait of Leonardo himself.
The Drawings of Leonardo da Vinci by Charles Lewis Hind (1907)
I normally do not comment unless I see something that really excites me,and this piece did just that,I like it so much Im starting a new Pinterest board around it.Great job,Me likes.
This looks like allot of fun and I love your comment about accepting the “oopses and darnits!” We should do that more in life! I paint mostly in watercolor but I’m always looking to step out
of my comfort zone in search of other creative outlets. Thanks for the inspiration!
Linda Roberts
Hi Anon – In this print, I used oil based intaglio ink, but it works as well to use water-based (akua, daniel smith, etc.) I’ve got video in the works to demonstrate this process on my channel: youtube.com/bdelpesco
What type of ink did you use? Oil based or water based?
Love this process…thanks for the info.
@Doodles – you can absolutely prep cardboard ahead of time with the medium, but it’s gotta be Gloss Medium & Varnish – not Matte – if you want the surface to be slick enough to release the ink from the plate to the paper. Especially if you’re transferring with a spoon or a brayer instead of a press.
I don’t know how much control you’d get with a hot glue gun. What if you gave the kids grease pencils to draw a simple design, and then you (and hopefully, an assistant) used the glue gun, or embroidery floss dipped in the medium to lay over their drawings? The medium dries fast.
Hi there! I’m a teaching artist and want to do something like this with my kids for a one day workshop. Do you think that I could put matte medium on the cardboard beforehand, then use hot glue (obviously helping them!) so that the glue dries right away? And, tempera paint?
@Gloria, Thanks for the compliment. Yes, you can get speedball and Akua inks for printmaking at Dick Blick and most art supply stores. The colors I used were mixtures saved as leftovers from previous printmaking sessions. (Scrape them into a square of cellophane, wrap and twist, label [oil based vs water, etc.] with tape.)
Belinda…I just love this. I am not familiar with this technique. Are printmaking inks readily available at craft stores?…and what colors did you use? This is just beautiful. Thank you.
Adrienne – books wouldn’t work, because you have to get in there and push the paper to the flat of the “plate” and get it to wrap around the raised glue areas too, so you have full contact between the paper and all elements of the inked plate. A book would only imprint your raised glue areas, because it’s too flat/hard/stiff to dip into the little flat areas between adjacent glue ridges. A hand rub with a drawer knob would work, or you can try a rolling pin (like you’d use to roll out dough for a pie) covered with an athletic tube sock, to help press into the low-lying areas of the plate. This, combined with some touch up hand rubbing with a spoon or a drawer knob should do the trick. :O)
this is wonderful – i soooo want to try this – and you believe it would work without a press, just with pressure from a book or something heavy?
Thanks for the information Belinda, I might want to give this a try someday. Right now I am plenty busy but you never know what will happen during the winter. I might need something to stave off cabin fever if the snow is plentiful. Doesn’t that sound wonderful right now, snow….:)
Carol, you could use glue on your board, but I’ve found that ink doesn’t release from the plate as well, and it doesn’t dry to the same hardness as the varnish – it’s sort of rubbery – which will reduce your details & give you trouble in inking/wiping/cleaning. Your plate will likely curl over time if you use glue, which would limit your edition size and cause you to utter expletives under your breath, so I would recommend getting the Liquitex Gloss Medium & Varnish – you can buy small containers of 8oz for about $6 on Blick and other in-store & online suppliers. And yes, the varnish blocks the ink and cleaning agents from absorbing into the plate, but it also makes the plate harder and stiffer, as well as slicker for releasing ink.
How awesome is that! Does look like a fun thing to do, Belinda. Instead of investing in the varnish could you cover the board with a thin layer of glue, let it dry, then add the raised components of the picture with more glue and use it that way? I assume the varnish is to keep the ink from being absorbed by the board.
I loved seeing this process. It does look SO fun and I loved seeing how the final piece evolved! THANK YOU!
Very cool. Thank you for sharing your process. You do inspire!