
What is a Silk Aquatint?
Silk aquatint is a variation of a printmaking method – Aquatint. The traditional version uses an acid bath, a metal plate, a blow torch and some pretty caustic materials.
This “silk” version is a home-studio, no-acid, Do-it-Yourself aquatint using plexiglass as a plate, synthetic silk and acrylic paint.
By most accounts, this alternative was invented by Massachusetts maritime painter and printmaker Donald Stoltenberg (1927-2016)

Silk Aquatint Printmaking – Wait, What??
The premise of a silk aquatint – on a larger scale – is this: pretend you took an 8×10 sheet of plexiglass, and you painted one side black. Then you adhered an 8×10 section of screen door mesh to the painted surface. Now you have a screen mesh on a black 8×10 plate.
Imagine applying black printmaking ink to cover all the mesh, and then wiped the mesh with tarlatan, intaglio style, like you would for an etching.
After wiping the surface of the screened plate, you’d still have enough ink huddled in the tiny square spaces between the strands of the screen to print a solid, black 8×10 square if you squeezed the plate against paper on a press. In silk aquatint, that’s what you’re doing to make the plate, but with silk screen mesh instead of screen door mesh.
On a micro-level, each strand in the silk mesh is protecting a square reservoir that will hold ink. (see below)
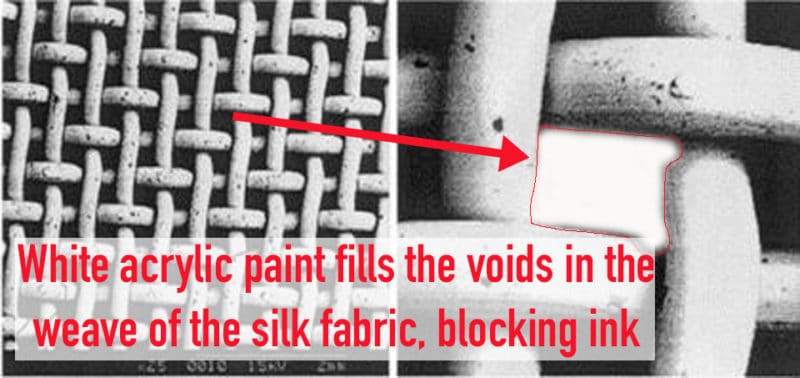
Block the Reservoirs with White Acrylic Paint!
The magic happens when you adjust which reservoirs in the mesh are empty and ready for black printmaking ink, and which are already occupied with various levels of white acrylic paint (see image above).
If you paint a solid white circle with acrylic paint mixed with acrylic gloss medium in the middle of your black screened plate, you’re filling the wells between the strands of mesh.
Now, when you ink the plate with black printmaking ink, and wipe it intaglio style, all of the ink on your white circle wipes away, because 1) there are no deep areas on the screen for the ink to settle into, since you filled them with white paint, and 2) the white paint is now slippery with the addition of the gloss medium, so the ink can’t cling, and it wipes away completely.
So, if you printed this inked and wiped plate, you’d have a black, solid field, with a bright white circle in the middle of your paper.
Can you visualize that? See what I mean? Totally Cool!

What You See is What You Get
When you ink, wipe and print the white circle plate, you get a clean white dot on a black 8×10 rectangle.
By varying the layers, thickness and brush application of the white acrylic to the screen – adjusting the depth of the “well” inside the screen’s mesh, you create subtle halftones and gradations in the print.
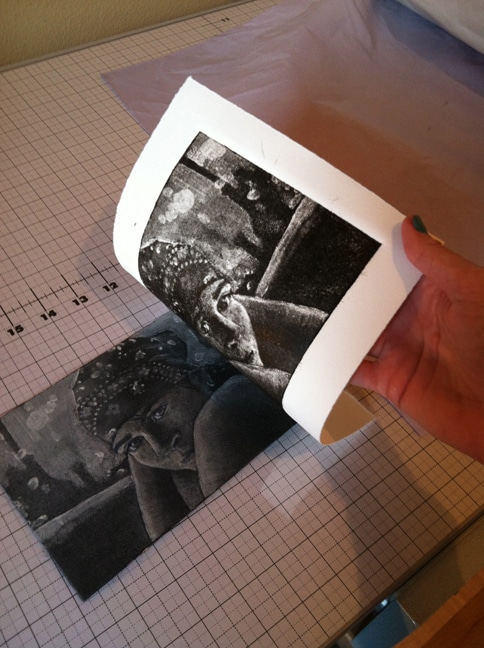
And for folks that find imagining the finished product on a traditional etching or engraving challenging – this method is WYSIWYG: What you See is What You Get.
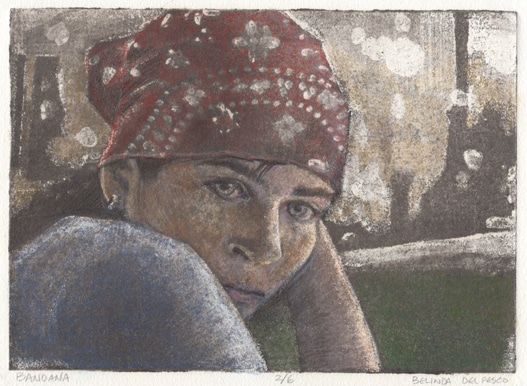
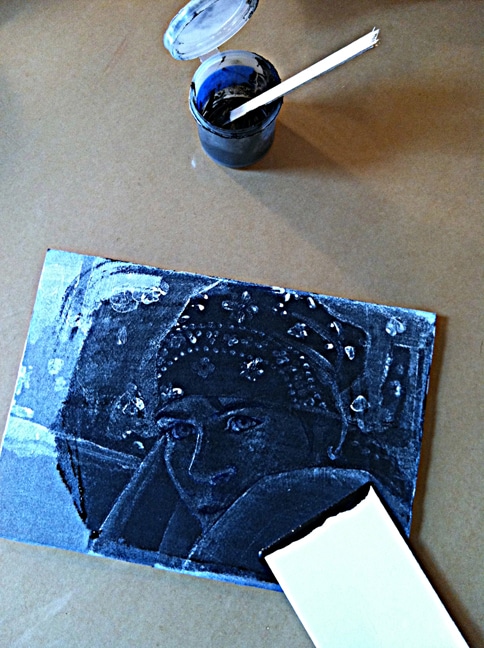
The plate looks just like the print (see the print being pulled near the bottom of this post as an example), albeit in reverse.
Intrigued yet? I knew you would be excited to try it!
Silk Aquatint Printmaking Experiments
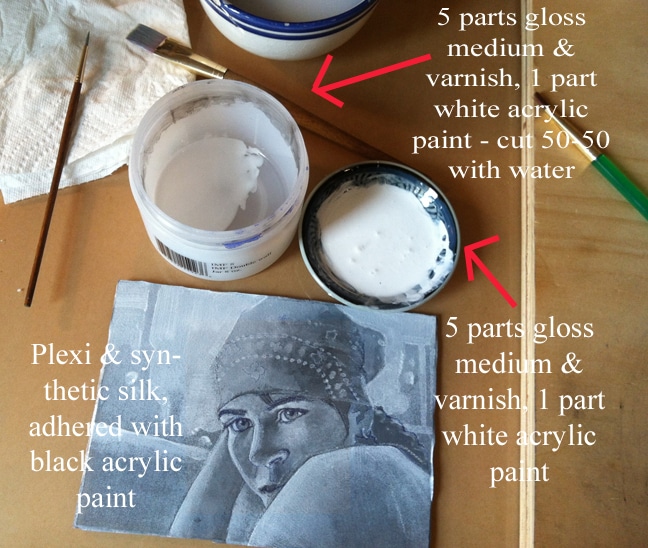
After making a few silk aquatints, I mixed two different consistencies of gloss medium and white acrylic paint to control variations in tone in the printmaking process. (Printmaker Sue Brown has written a manual on silk aquatint here.)
In previous tests, I used a 50/50 blend of gloss medium and acrylic paint, and the result was a little too thick and viscous for finer details.
Thinning it in the ratios described in the photo below gave me better control of layering and feathered edges.
The Beginnings of this Print
The base of this silk aquatint plate is a sheet of standard plexiglass with polyester silk adhered to the surface with thinned black acrylic paint.
After the black acrylic paint under the silkscreen mesh was dry, I put a drawing on the silk with a white colored pencil, and then painted in layers of white acrylic.
I used a mixture of gloss medium varnish and white acrylic paint, in all the areas I wanted to block the weave of the silk. Areas where the weave of the silk are not painted will print dark.
You can think of painting the plate as a process of “painting the light”.

Make a Silk Aquatint
Go on, Now – You’ve GOT This!
So, there you have it – how to make a silk aquatint! I hope you’re intrigued enough to give it a go.
If you’d like to read more about this printmaking process, and the supplies you’ll need, here is another post about making a silk aquatint print.
If you’ve made one, and you have any tips, tricks, ideas or cautions, please leave them in the comments, because you know – we get better at art together. 🙂
Thanks for stopping by today and I’ll see you in the next post!
Belinda
P.S. You can subscribe to this art blog to get posts via email as soon as they’re published. Sign up here.

Art Quote
Actually, it goes the other way. Wouldn’t it be great to be gifted? In fact… It turns out that choices lead to habits. Habits become talents. Talents are labeled gifts. You’re not born this way, you get this way.
Seth Godin
Wow I have only just found this post and am excited to get started, I do have a couple of questions though.
You say in the description that you “put a drawing on the silk” how exactly? As it’s a black plate at this time.
And what kind of “silk” are you using?
Thank you.
Nicola
Hi Nicola, I make the initial drawings using a white colored pencil – from a set of Prismacolor pencils. Any white or light-colored pencil will work. For options on silk, see this post about supplies: https://www.belindadelpesco.com/silk-aquatint-printmaking-2.html/
I’m wishing you many happy days of silk aquatint printing!
In the workshop where I took the Relief classes I have access to etching ones. Unfortunately I’m not in the same city now and won’t go back for some time. That’s why I’m considering buying a small/medium one for myself and sharing with friends. I’m a middle-age creative (retired from schedules and engagements) woman. My degree is in Philosophy and I’m an Art fan, so I love to try new techniques and media for better expression, you know?
Anyway. Keeping in mind what you are telling me about this, I think I can make a better choice now. I’m excited! 🙂
Thank you so much Belinda! Reading about your Printmaking discoveries is always a pleasure and oxygen in this crazy world. Thank you for being so professional and human ♡
Marissa
♡
I have a book binding one and do some of my relief prints there. I’m planning to get a bigger one during this year. Do you have any advice considering this technique? I would really appreciate it 🙂 Thanks for your replies!! <3 <3
Hi Marissa – I’m not sure you could pull a detailed print of a silk aquatint on a book press. The pressure is distributed along the length and breadth of the platen, which is great for relief prints. On an etching press, all the pressure is concentrated on a 1/8 to 1/4 inch width along the length of the drum – so it’s more pressure per square inch. Do you have a friend with an etching press to borrow time on, or is there a college nearby, where you could print an aquatint?
Belinda is this a kind of mix between intaglio and serigraphy? The process and finishing look fantastic. It got my attention! Do you have a video showing the process? I’d love to give it a try. Thanks! 🙂
Hi Marissa, I think you could categorize this method as a mix of silkscreen and intaglio… but in process, it feels like a painterly form of aquatint. Thanks for your compliments. I’m working on a tutorial video, but the set up and filming is happening in fits and starts while squeezed into a million other projects. Thanks for your interest. Do you have a press?
This is fascinating, thankyou for sharing, definitely soething totry in the new year.
Hi Liz, Thanks for letting me know you’ve enjoyed this post. I hope you gather your most fun art friends and everyone makes gorgeous silk aquatints together!
Alan, Thanks so much for your note and your compliment. Yes, the value control achieved by layering glazes of acrylic and gloss medium/varnish onto the screen is fascinating. I have much to learn still, so I will continue and repeat the process till the right “muscle memory” settles in and I don’t have to think so hard to get the effects I want. I have new silkscreen fabric to try next, so I can’t wait for a little more time to get inky. 🙂 Thanks again for your encouragement!
Belinda,
I’ve seen so much progress in your recent endeavors with this medium (silk screen aquatint). From the look of the test prints you are mastering the required “fill” (of the screen pores) to achieve the values you desire.
They look amazing!
Happy Printmaking,
Alan