
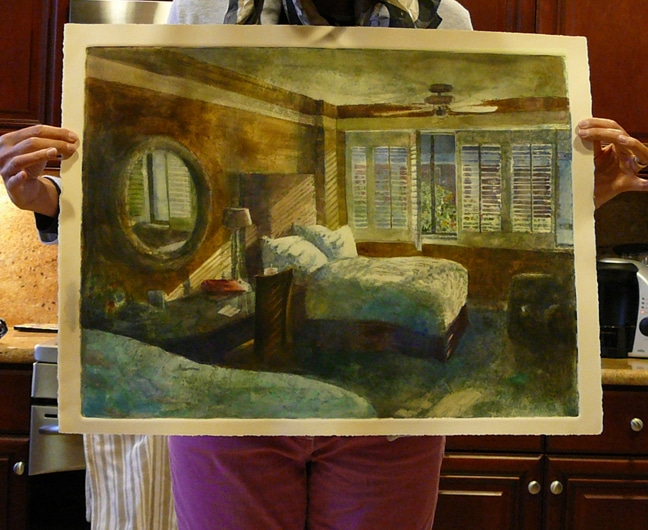
What’s a Monotype?
A few posts back – the one about printmaking ink I accidentally left on a monotype plate for several weeks – I got a flurry of questions about monotypes.
So let’s review, shall we?
Monotypes are a printmaking method that doesn’t require carving, engraving, acid or solvents. And depending on your approach and materials, you don’t need a press to print them.
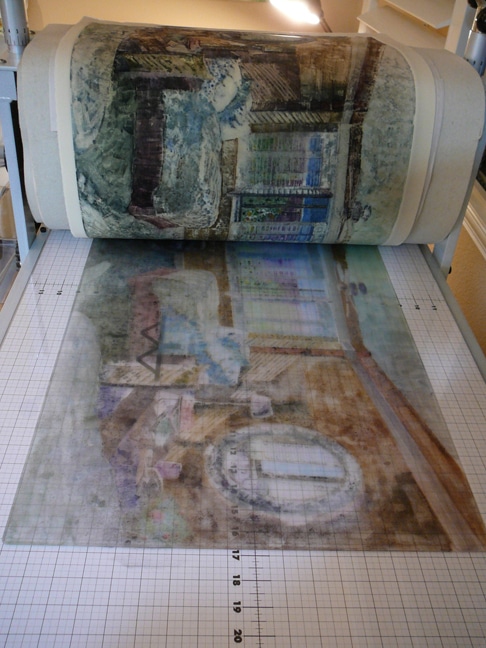
Images are simply painted onto a smooth plate, and while the pigments are still wet, the plate is pressed firmly against a sheet of paper.
When the paper is pulled from the plate, the inks and paints have been transferred to the paper, creating one print – in reverse of the original design on the plate – and that print is called a monotype.
The mono in the root of the word refers to One. (NOTE: a Monoprint is different from a Monotype: if there’s a mark or texture in the plate that can be repeated, regardless of variations of ink application, that’s a monoprint.)
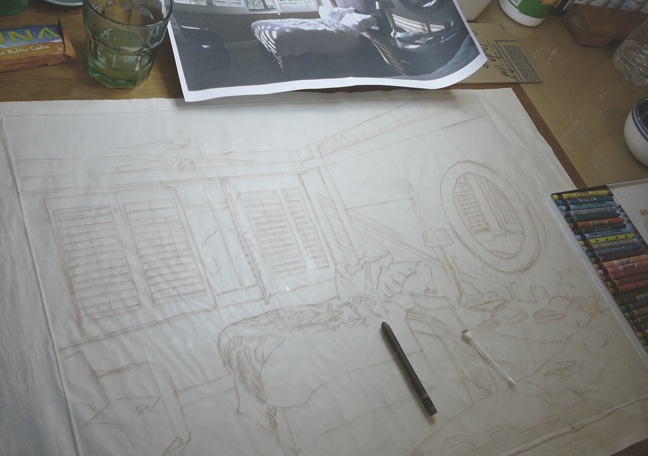
Plate Preparation
Before I started drawing on this plate, I sanded it (see the details below) and coated the surface the night before with a thin layer of Gum Arabic.
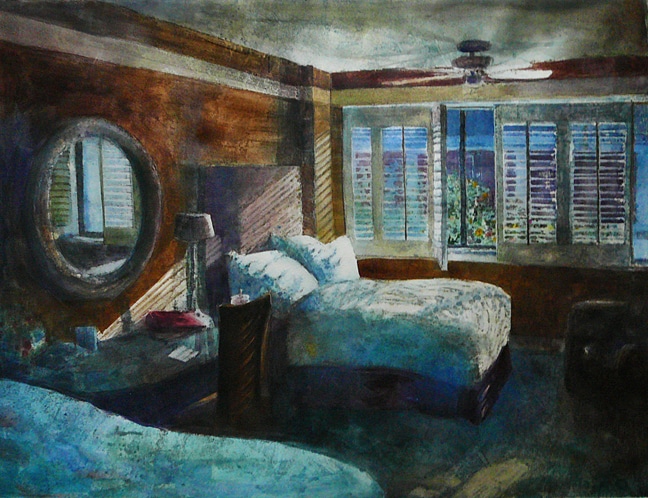
To transfer the image from the reference photo to the plate, I used the grid method. I measured and lined a grid on the plate with an ivory Caran D’ache water soluble crayon, and then laid the drawing in with a burnt sienna crayon from the same set.
Using a Drawing Bridge
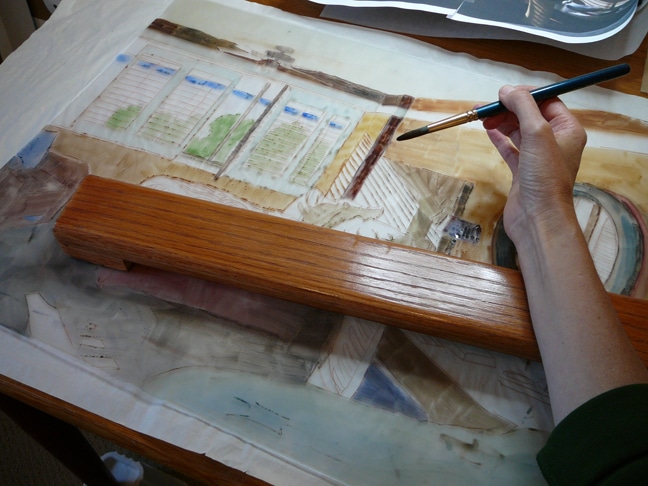
My awesome step dad TC made me this drawing bridge, above. The bridge allows me to stabilize my forearm, without resting my hand on the plate and smudging the pigments.
Both ‘feet’ of the bridge are covered with felt so they won’t damage the plate. (I also use this on larger graphite and charcoal drawings.)
Before I purchased a press, I spent time using the presses in the Print Lab at College of the Canyons. The handy folks in charge over there fabricated drawing bridges, and painted them bright yellow in an attempt to deter theft.
By the end of the semester, there was only one yellow drawing bridge left. My step dad made a pile of new drawing bridges in various sizes, and sent them to the college. See what I mean about awesome? Lucky me.
If you don’t have a woodworking person in close proximity to make you a handy drawing bridge, you can buy a drawing bridge online. A mahl stick would also work, especially if you like your surface upright, rather than flat.
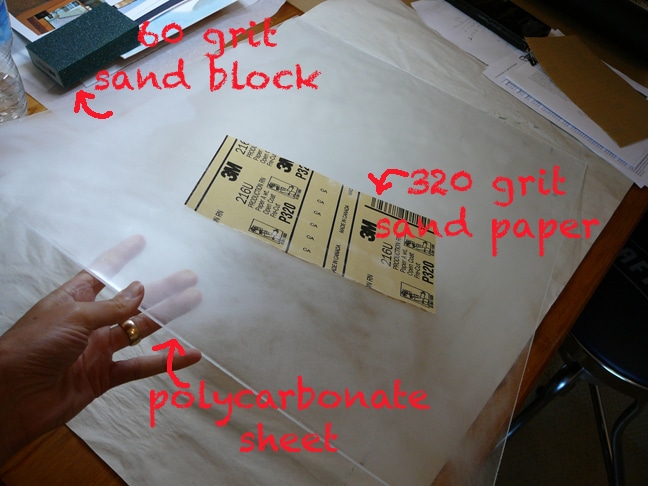
Preparing Plexiglass for Monotype Prints
Since so many folks have written to ask about how to prepare a plexiglass plate for watercolor monotypes, I’ve documented the process here so you can play along.
(If you’re not much into process, and you’d prefer to scoot from here, let me beam you over to check out this cool list of art show aggregators.)
In the photo above, I’m using an 18×24 Polycarbonate sheet (.080 inches, Optix brand).
No Accidental Scratches
The Polycarbonate sheet was secured to a table with my snazzy, red Bessey clamps (below).
I laid a sheet of paper underneath the plate as a cushion, and another scrap of watercolor paper under each grip of the Bessey clamps to protect the plate surface.
I used 320 grit sandpaper (with a respirator on – be careful not to breathe this stuff) to sand the surface gently & evenly in a circular motion from edge to edge all over one side of the plate.
Sanding the surface will give the plate a bit of tooth so it’ll hold pigment without so much beading up. (Watercolor gathers like little beads of mercury when you paint on a polycarbonate plate. The scuffed surface helps, but it’ll still bead a little bit unless you treat your plate beforehand with a thin coat of gum arabic.)
By sanding one side of the plate, you’ll have the option of using a slippery side for oil paint or thick printmaking inks, and the opposite, more toothy side to use with your wandering pigments.

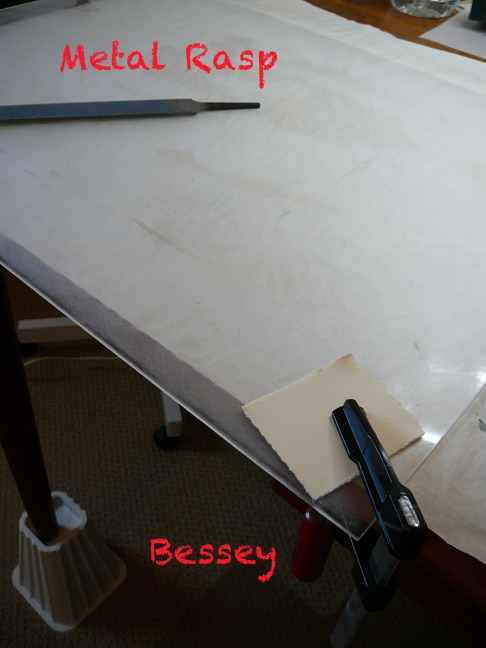
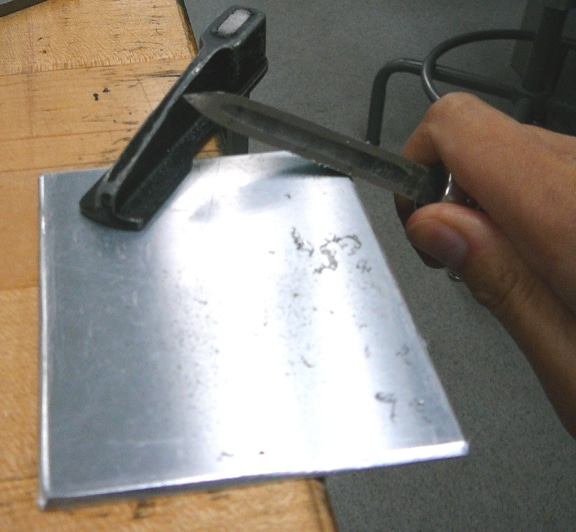
I have a trusty set of Besseys: 2″ x 4″ Wood Clamps. I use them to hold acrylic or metal plates firmly against a table. Set them up with a bit of overhang so you can use a metal rasp to file the edges of the plate into a nice bevel. (Bevels are a good thing – see below.)
Why You Should Bevel a Printmaking Plate
I made a short video about beveling acrylic and plexiglass plates, if you’d like a tutorial with moving visuals. You can watch it below.
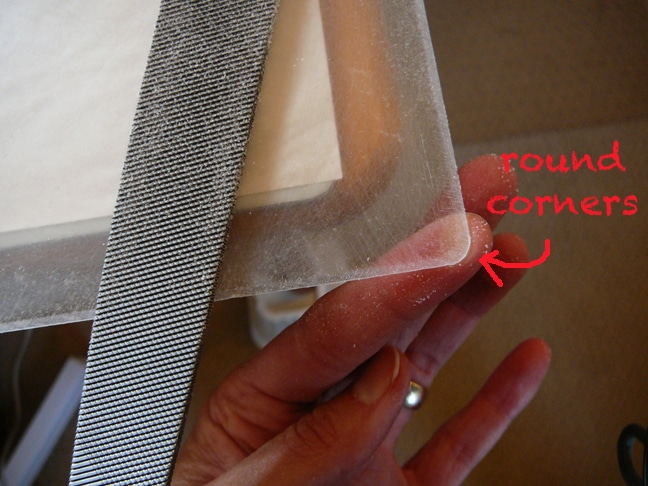
Round the Corners with the Rasp
I use the rasp to file down the pointy corners on my acrylic printmaking plates.
This helps to reduce the inadvertent poke in the ribs or scratch across the forearm when you’re handling the plate. Rounded corners also make a really nice plate impression on the four corners of your print.
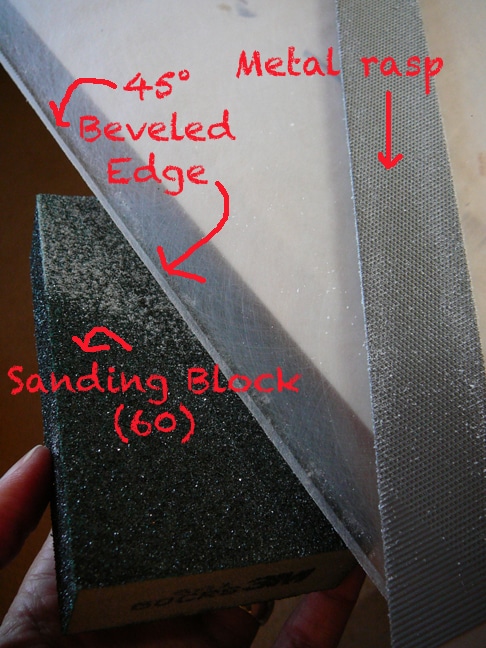
Sand First, Bevel Second
Beveling Your Plate
After sanding the entire surface of the polycarbonate plate, I used a medium to fine metal rasp, to file a forty five degree bevel on all four edges.
When the angle felt right, I switched to 320 sandpaper wrapped around a block. The sandpaper shaves off the grooves left by the rasp in the bevel, so they won’t hold ink or paint during printing.
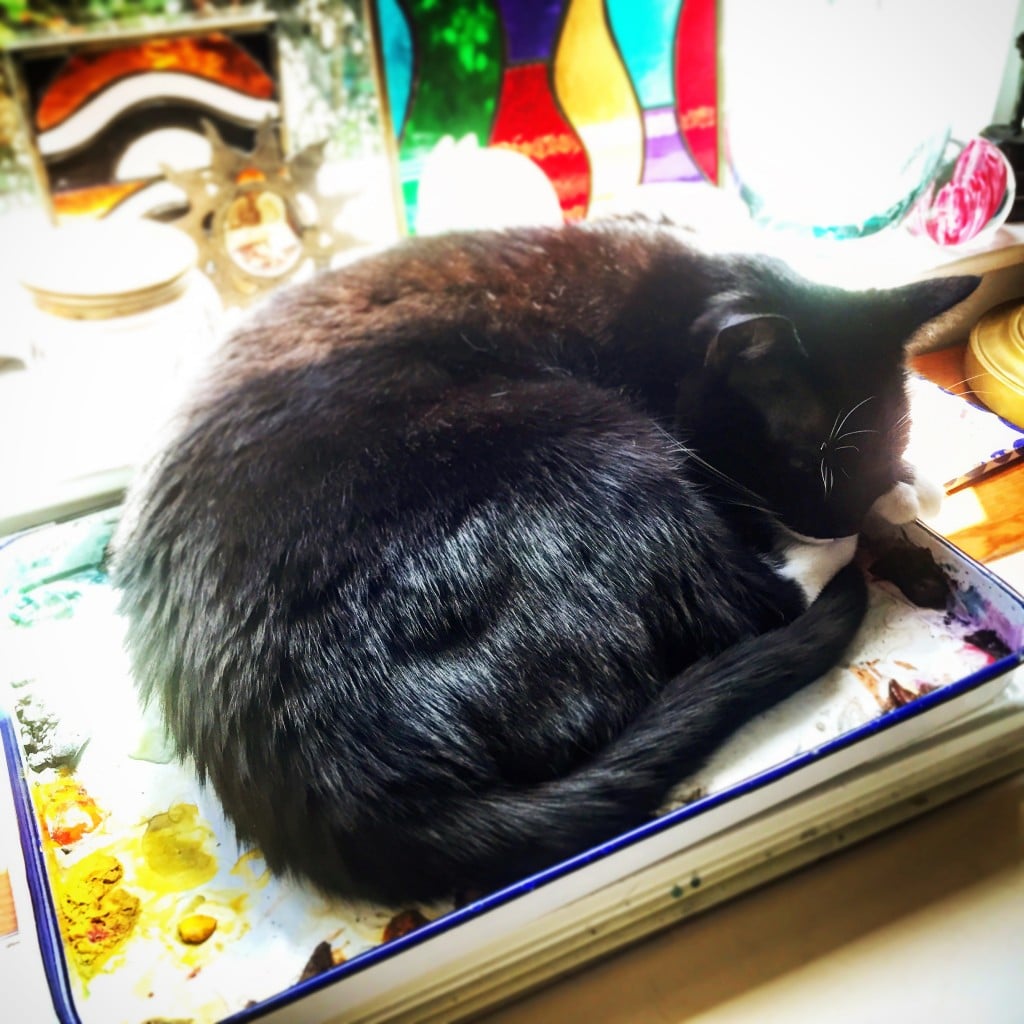
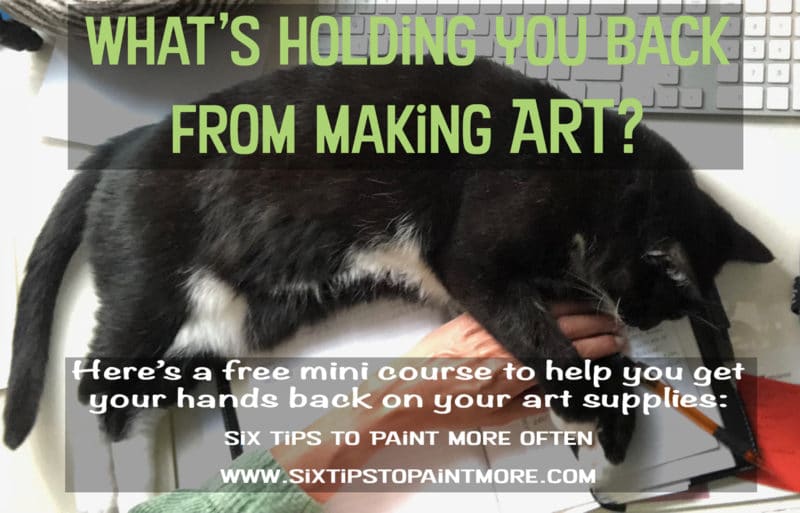
About that Animal Hair in the Art Studio
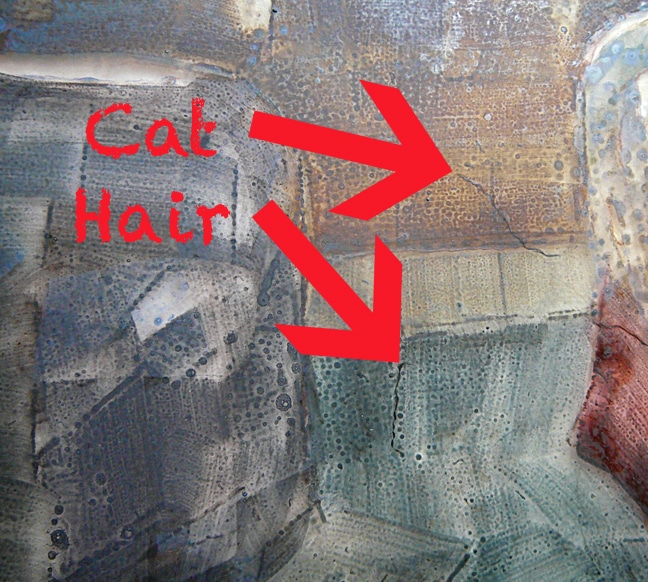
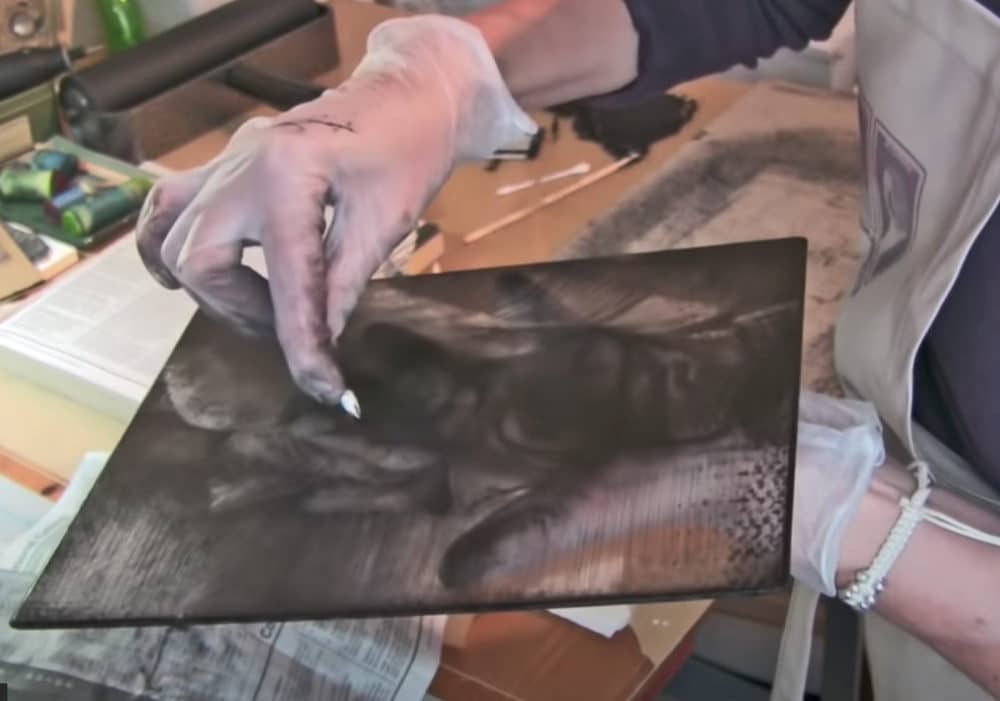
Here’s a little close up of the plate just before I printed (below).
There’s always a risk of cat fur in my art supplies, and sometimes, it finds a way into my work. I pulled these little feline bonuses out before printing.
I know a lot of artists who have a furry form of company in their studios, so this is not unusual. Making art full time can be a very isolating job. You might even forget how to talk to people. Cats and dogs help.
Listening to audiobooks (I’m listening to this one now) and getting encouragement to take frequent breaks to walk the dog or cuddle the cat is a very good addition to the creative process (if you like animals). But there’s fur.
Embrace the Bevel
There are a couple of reasons for beveling a plate, and they’re kind of important to note here.
If you’re printing an intaglio plate on a press (especially a borrowed press), you’ll use layers of wool and felt blankets and a rubber pusher. The sharp right angle on the edge of your un-beveled plate, under heavy pressure from the cylinder on the press, will slice right through a full set of blankets during printing.
Press blankets are expensive.
In Praise of Margins
That same chop, slice and dice from the un-beveled edge of your plate can go through your paper too.
So, instead of a nice plate impression in your beautiful full sheet of BFK Rives, your print will be cut to the exact size of your plate, with no margins around your art.
Not as crucial as the first scenario, but worth avoiding.
Safety in the Art Studio
The last reason (I promise) relates to cutting your hands.
Whether you’re using metal or acrylic plates, you’ll handle the plate a lot.
Your hands hold the plate by the edges during surface prep, inking, wiping, moving back and forth between the press and your work table. You’ll handle it a lot while cleaning after printing too.
It’s so much safer to bevel the sharp edge off the top of your plate. Don’t forget to also use a coarse sand block (see above) to scuff the bottom edge, because it can get razor sharp as the bevel sweeps to the base of that slope.
Printmaking Paper Soaking When you don’t have a Bathtub
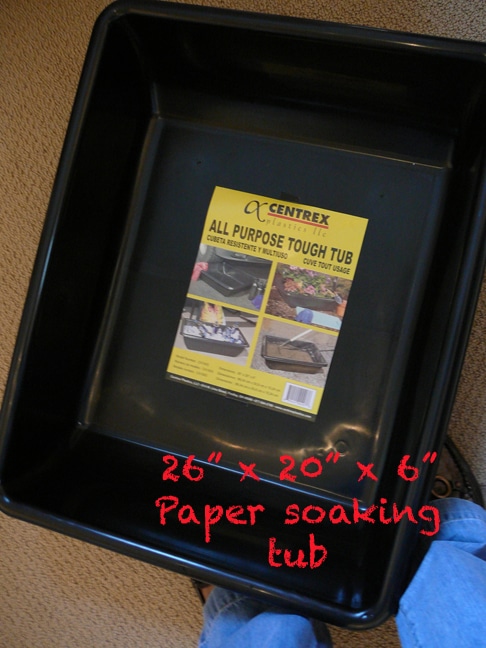
As an aside, this (below) handy-dandy little item is another hardware store goody: an all purpose tub.
This thing works nicely for soaking paper before printing. (And it was $7.)
Need to soak paper but someone’s in the bathtub? No worries, just grab your new Tough Tub! (Here’s an alternative.)
Making a Monotype for the First Time
What do you think you’ll make for your first monotype? Look at videos on youtube (here is a playlist of monotype tutorials) to get better acquainted with all the ways you can make a monotype from the kitchen counter.
Keep your first designs small-ish and simple to start. Expand your size and complexity as you get cozy with the process.
Let us know where we can see your work with a link in the comments. We’ll come visit and cheer you on. 🙂
Thanks for visiting today, and I’ll see you in the next post.
Belinda
P.S. You can subscribe (it’s free) to get each new post as an email by signing up here.
P.P.S. Here is a great list of the 50 Best Podcasts from 2018.
Art Quote
One evening, Rosa Bonheur (1822-1899) was dining with me and some friends. Among the latter was a young lady recently married, who related to us an account of the furnishing of her house. All the rooms were finished except the dining room; for this last, her husband could not, for the moment, give her the money, and she was compelled to hold her little receptions in her sleeping room. After dinner, Rosa asked me for a large sheet of drawing paper, and while we were talking and she herself smoking a cigarette, she sketched a delightful hunting scene, which she signed with her full name. Then, under cover of a general conversation on music, as tea was being served, she approached the young wife and said to her: “Take this picture to (Benjamin) Todesco, on your return to Paris, and he will give you at least fifteen hundred francs for it. Then, you will be able to furnish your drawing room.”
French Landscape painter, Joseph Verdier writing about his friend, the painter Rosa Bonheur
Sorry I mean incredible blog. Writing too fast again.
XOXOXOXOXO Barbara
Hah! I knew what you meant. That’s the teacher in you, eh? ? XO
Beautiful work, and incredibly blog. Happy New Year, and thank you for all the inspiration in 2018.
XOXOXOXOXOXO Barbara
Hello there my friend, Thank YOU for all the lovely, encouraging, always warm feedback!
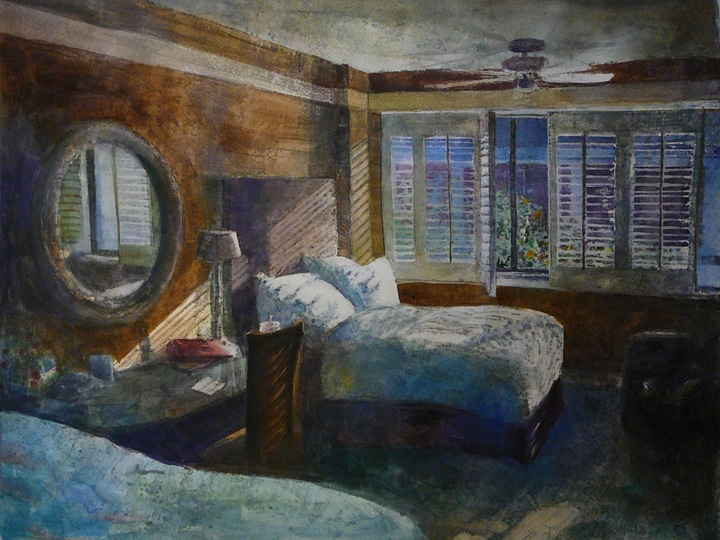
Stunning painting! Those mesmerizing slanted streams of sunlight always catapult me into a dreamworld. I love those rendering of interiors in the early morning or late afternoon that you do so well. And, thanks for the audiobook mention – I was thrilled to find it in my library! I’m currently listening to “Woody The Biography by David Evanier”, an in-depth and well researched bio of Woody Allen and amazing dissection of some of his best movies, an era that I totally missed at the time. Great discovery.. Wishing you continued success and enjoyment of all your artistic endeavors in 2019!
Thanks for the nice compliments, Gayle! I wish you the same passionate curiosity about everything creative in 2019! Here’s to artistic adventures, quenching our thirst for more, and good, sturdy health to carry our pursuit forward! 🙂
Wonderful art and posts. I always look forward to seeing what you’ll teach and show next. You’ve inspired me to get painting and printing again. Just invested in an Akua pin press and inks. Thank you!
Wow, Vicky! You’re going to have So Much FUN with your new art supplies! Will you be blogging about it, or sharing images anywhere on social media?
Beautiful artwork! Love Monterey Retreat. Wow- That is big and gorgeous! So enjoyed reading all about the process! You did a great job on the tutorial too:)
Great tutorial, Belinda, as always.
And for soaking paper? I use a kitty-litter tray.
Great tutorial full of handy tips & hints with a beautiful result as well.
What a fantastic post, Belinda. Your print is awesome.
Really good! Always wanted to do some printmaking, havn’t since art school days. Good to see the steps you took to make it also. The image itself I like for its strong composition and design, all those horizontal stripes and shadows, and it’s got a rich colourful intensity to it. Well done …MORE MORE!!
I so admire you and the work you do, Belinda… Amazing!!!